안녕하세요? 도정진입니다.
아래 글에 이어서 해당 xfce4 session 에서 스크린샷을 찍는 방법에 대해서 알아보도록 하겠습니다.
https://blog.djjproject.com/814
1. xfce4-screenshooter
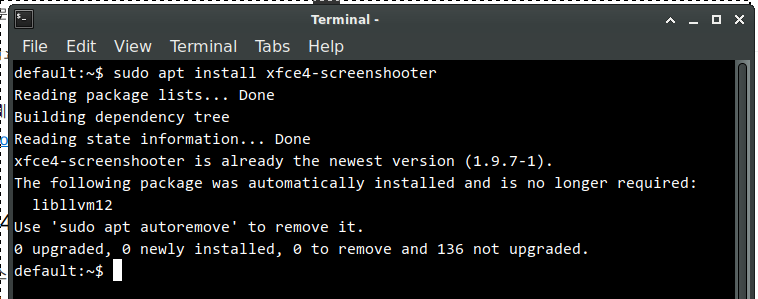
일단은 스크린샷을 찍기 위해서 xfce4-screenshooter 패키지를 활용합니다.
터미널을 열어서 아래와 같이 패키지를 설치합니다.
| default:~$ sudo apt install xfce4-screenshooter Reading package lists... Done Building dependency tree Reading state information... Done xfce4-screenshooter is already the newest version (1.9.7-1). The following package was automatically installed and is no longer required: libllvm12 Use 'sudo apt autoremove' to remove it. 0 upgraded, 0 newly installed, 0 to remove and 136 not upgraded. |
2. 터미널에서 테스트
xfce4-screenshooter 를 실행하여 help 를 입력해 보시면 아래와 같이 확인이 가능합니다.
| default:~$ xfce4-screenshooter --help Usage: xfce4-screenshooter [OPTION…] Help Options: -h, --help Show help options --help-all Show all help options --help-gtk Show GTK+ Options Application Options: -c, --clipboard Copy the screenshot to the clipboard -d, --delay Delay in seconds before taking the screenshot -f, --fullscreen Take a screenshot of the entire screen -m, --mouse Display the mouse on the screenshot -o, --open Application to open the screenshot -r, --region Select a region to be captured by clicking a point of the screen without releasing the mouse button, dragging your mouse to the other corner of the region, and releasing the mouse button. -s, --save File path or directory where the screenshot will be saved -i, --imgur Host the screenshot on Imgur, a free online image hosting service -V, --version Version information -w, --window Take a screenshot of the active window --display=DISPLAY X display to use |
일단은 저의 경우에 스크린샷을 따로 파일로 저장할 필요는 없어서, 아래와 같이 -r -c 옵션만 지정하여 사용하기로 했습니다.
-r : 영역 지정하여 스크린샷 찍기
-c : 클립보드로 복사하기
아래와 같이 실행하면 바로 영역 지정모드로 마우스가 바뀝니다.
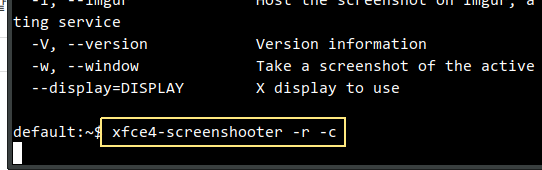
| default:~$ xfce4-screenshooter -r -c |
3. 단축키 등록
일단은 브라우저로 사용하는 시스템이기 때문에 다른 단축키와 겹치면 안됩니다.
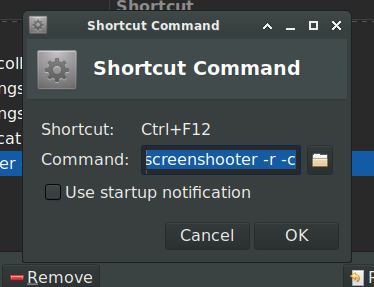
그래서 CTRL + F12 키로 지정을 하도록 하겠습니다.
Applications --> Settings --> Settings Manager --> Keyboard 로 이동합니다.
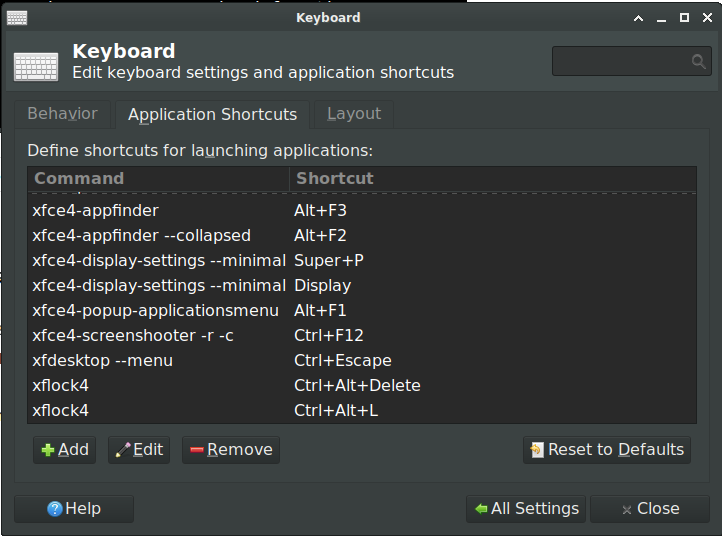
여기서 Add 를 눌러 키를 설정합니다.
4. 윈도우 그림판 대체
윈도우에서는 스크린샷을 찍어서 그림판으로 짤라내고 네모 박스를 추가하여 첨부를 하는데요. gimp 같은 무거운 것 말고 pinta 라는 그림판 클론이 있습니다.
아래 명령어로 설치합니다.
| default:~$ sudo apt install pinter |
설치하고 나면 pinter 아이콘이 생깁니다.
실행을 하면 아래와 같이 생겼습니다.

스크린샷을 클립보드에만 넣도록 설정했고 복사 붙여넣기를 하면 아래와 같이 됩니다.
이때 붙여넣기 된 부분만 짤라내고 싶으면 아래 명령을 사용하면 됩니다.

상단 메뉴바에 Image --> Crop to Selection 이라는 메뉴가 있습니다.
단축키로는 CTRL+SHIFT+X 를 누르면 되네요.
그러면 아래와 같이 붙여넣는 부분만 짤립니다.

그리고 좌측에 색 지정하여 네모박스 등을 넣으면 됩니다.

간단히 여기서 마치도록 하겠습니다.
감사합니다.
'서버 > 리눅스 서버' 카테고리의 다른 글
| 리눅스 zram 설정 하기 (zram-tools) (747) | 2023.01.17 |
|---|---|
| kasm-ubuntu (novnc docker) 에서 카카오톡 설치하기 (1180) | 2022.11.02 |
| ubuntu xfce novnc docker (kasm image 사용) 구축하기 (421) | 2022.10.24 |
| Proxmox SSD 용량 확장(파티션 및 LVM) 마이그레이션 진행기 (383) | 2022.08.18 |
| Docker 컨테이너로 와이파이 AP 만들기 (Intel NUC J5005) (394) | 2022.08.15 |


댓글